Category Archives: Technical

JUnit tests made easy with Guice

Guice is an open source tool by Google that aims at simplifying the construction of software components especially when complex relationships exist between its parts.

Until I came across Guice (and Spring, to be honest), I was used to honor two main design patterns: factory methods and builder. The intent of these two patterns is to separate the construction of objects from their representation and from their usage. For instance, if you delegate the construction of instances of an interface to a factory method, which concrete class will be used to create the instances will depend on the particular implementation of the factory method which, in turn, will vary from application to application. On the other hand, using a builder you centralize the construction of complex objects so that the way these objects are built (and their dependencies in particular) is defined once for all in the code. Of course, if you follow these two patterns in Java you’ll have to abandon the new operator.

Guice is an easy way to blend these two patterns together into a single framework and much more. Thanks to the dependcy injection design pattern, Guice helps you decouple components and configure dependencies. All you have to do is define which interfaces are implemented by which concrete classes and which objects are to be injected in your components.

If you’re unit testing components with JUnit you surely face where to put the initialization code that reads the Guice configuration modules and creates the injector(s). As a trivial solution you could make every test class to extend a common class with a static method that is annotated with @BeforeClass; this method has to be used once per test to setup the Guice injector. While this is an acceptable solution, it doesn’t take full advantage of the Guice capabilities. When I faced this problem for the first time I asked myself what the best way to inject the components I needed in my tests was. I wanted to obtain something like this:

public class ServiceTest {
    private IService service;

    @Inject
    public void setService(IService service) {
        this.service = service;
    }

    @Test
    public void testApp() {
        Assert.assertEquals("Hello World!", service.doSomething());
    }
}

I then found a post about integrating Guice and JUnit that solved almost all my doubts. The author suggested to create a custom JUnit class runner that overrides the default behaviour and, in addition to instancing the test class, it configures Guice and injects the dependencies in the test class instance. The custom class runner must be passed to the JUnit @RunWith annotation. This is a more elegant solution with respect to the before mentioned trivial one. But still it had something I didn’t like: the fact that the Guice modules have to be passed to the constructor of the custom class runner. Wouldn’t it be better if the list of Guice modules was declared within the unit test as a parameter of an annotation?

I got inspired by how JUnit test suite works and I wrote my own class runner:

public class GuiceJUnitRunner extends BlockJUnit4ClassRunner {
    private Injector injector;

    @Target(ElementType.TYPE)
    @Retention(RetentionPolicy.RUNTIME)
    @Inherited
    public @interface GuiceModules {
        Class<?>[] value();
    }

    @Override
    public Object createTest() throws Exception {
        Object obj = super.createTest();
        injector.injectMembers(obj);
        return obj;
    }

    public GuiceJUnitRunner(Class<?> klass) throws InitializationError {
        super(klass);
        Class<?>[] classes = getModulesFor(klass);
        injector = createInjectorFor(classes);
    }

    private Injector createInjectorFor(Class<?>[] classes) throws InitializationError {
        Module[] modules = new Module[classes.length];
        for (int i = 0; i < classes.length; i++) {
            try {
                modules[i] = (Module) (classes[i]).newInstance();
            } catch (InstantiationException e) {
                throw new InitializationError(e);
            } catch (IllegalAccessException e) {
                throw new InitializationError(e);
            }
        }
        return Guice.createInjector(modules);
    }

    private Class<?>[] getModulesFor(Class<?> klass) throws InitializationError {
        GuiceModules annotation = klass.getAnnotation(GuiceModules.class);
        if (annotation == null)
            throw new InitializationError(
                    "Missing @GuiceModules annotation for unit test '" + klass.getName()
                            + "'");
        return annotation.value();
    }
}

Basically, if you use this runner your test will be :

@RunWith(GuiceJUnitRunner.class)
@GuiceModules({ ComponentsTestModule.class, ServicesTestModule.class })
public class ServiceTest {
    private IService service;

    @Inject
    public void setService(IService service) {
        this.service = service;
    }

    @Test
    public void testApp() {
        Assert.assertEquals("Hello World!", service.doSomething());
    }
}

I think this is a cleaner approach and, in fact, it is very similar to how unit tests are configured with Spring. The advantage is that every needed module is declared clearly in the unit test and could be easily added or removed.
I uploaded the code on GitHub, feel free to check it out from my account and leave a feedback: GuiceJUnitRunner.

Project is based on Maven2 and Eclipse. These are some easy steps to download and test it:

% git clone git://github.com/sfragis/GuiceJUnitRunner.git
% cd GuiceJUnitRunner
GuiceJUnitRunner% mvn test

Ubuntu 10.10 on Sony Vaio VPCF13V5E: work in progress

My Sony Vaio VPC-F13V5E

Some weeks ago I bought a new notebook Sony Vaio F-series VPC-F13V5E which I’m going to use mainly for programming.
Its strong points are:

  • CPU Intel i5-460M
  • 6GB RAM
  • NVIDIA® GeForce® GT 425M 1GB
  • HD 320GB 7200rpm
  • Display resolution 1920×1080
  • 2 USB 3.0 ports

Of course I immediately tried to install Ubuntu 10.10 64bit on it but I run into unexpected problems some of which I’m still trying to work out.
In this article I’m going to describe what works and what doesn’t so far.

First off, this is what worked out of the box:

  • Audio output (read on for audio input review)
  • The web camera (this was unexpected, I wouldn’t have bet a cent that it worked!)
  • Wireless card
  • Ethernet card
  • Increase/Decrease volume via Fn key

Now the sore points.

Problem #1: display resolution

After installation completed, the display resolution was completely wrong (something like 1024×768 if not lower, don’t know exactly, but surely not the one I expected). This was solved by installing the proprietary NVIDIA drivers. But then something else happened…

Problem #2: NVIDIA drivers

After booting with the new proprietary divers the display turned blank with the blinking cursor on the top left corner. This was due to the latest NVIDIA drivers not loading correctly or the X server not working correctly with these drivers (I didn’t understand actually).
This is still an open bug (https://bugs.launchpad.net/ubuntu/+source/nvidia-graphics-drivers/+bug/655078) but has a temporary solution: downgrade the NVIDIA modules to version 256.53-0ubuntu3_amd64 (see bug report for the links to the deb packages).

25th December – Update

Installing the bleeding-edge drivers (provided by a PPA, not officially released by ubuntu) seems to solve the issue. Add this repository to the APT source list, update and upgrade the drivers: http://ppa.launchpad.net/ubuntu-x-swat/x-updates/ubuntu. After a reboot you should see the NVIDIA logo.

Problem #3: touchpad 1/2

Touchpad didn’t work out of the box, I had to change the following parameter in /etc/default/grub from

GRUB_CMDLINE_LINUX_DEFAULT="quiet splash"

to

GRUB_CMDLINE_LINUX_DEFAULT="quiet splash i8042.reset i8042.nomux i8042.nopnp i8042.noloop"

and then run sudo update-grub2.
This fixed the problem and after reboot the touchpad was working again (buttons, third button emulation, touchpad click and vertical scrolling).

Problem #3: touchpad 2/2

The touchpad is working but, as I discovered, it’s not detected correctly. In facts, xinput --list reports it’s an ImPS/2 Generic Wheel Mouse rather than a Synaptics TouchPad. This is quite annoying because some configuration programs (like synclient and touchpad-indicator to tell a few) don’t work at all. For example, you cannot disable the touchpad click or turnoff the touchpad when an USB mouse is pluggged in.
The issue seems to be reported in Lauchpad (https://bugs.edge.launchpad.net/ubuntu/+source/linux/+bug/565543) so maybe in a near feature it will get fixed.

Problem #4: suspend

Suspendo to RAM doesn’t work, it leaves the screen blank and pressing the power button doesn’t resume it. I’ve yet to investigate about it.

Problem #5: hibernate

Same story, it doesn’t work. Maybe there’s a common reason with the suspend stuff.

14th January – Update

Thanks to Greg who pointed me to a possible solution to the suspend to ram and hibernate issues. That post is few months old but, despite the module name that changed in the meanwhile, it still holds.
You just have to create two files (/etc/pm/config.d/00sleep_module and /etc/pm/config.d/unload_module) and paste this content:
SUSPEND_MODULES=”xhci_hcd”
If I understood correctly, that line makes the kernel to unload the xhci_hcd module before suspending or hibernating. It’s not clear to me whether this is a temporary solution until a new kernel will fix the module, but it works (and I’m happy with it). To follow the discussion on Launchpad go to this other link: https://bugs.launchpad.net/ubuntu/+source/linux/+bug/522998.

Problem #6: microphone

Doesn’t work yet but a fix will be included in kernel 2.6.36 (see http://code.google.com/p/vaio-f11-linux/wiki/EnableMicrophone). I’ve not much time to waste in kernel compiling so I’ll wait for the fixed version to become available.

So far so…

I’m a bit disappointed about all these problems because they reminded me the old times when I struggled to get Linux installed on new hardware and I had to wait for months before someone came out with a valid solution. Not that I cannot use Ubuntu for my projects and daily usage but for a while I really hoped I could say “I installed Ubuntu and everything worked out of the box”. The fact is these issues are not minor, these are something that prevents the average user from start (or keep on) using Linux.
Anyway, I’ll try to keep this post up to date so that it could help those who are installing Linux on this notebook.

Improving TIFF preview in Alfresco Share

In my experience I’ve noticed that one of the great features of Alfresco Share that is really appreciated by the users is the documents preview in the document library page. Recently I came across some TIFF documents whose preview quality was rather poor if not completely unusable. This was caused by ImageMagick doing a ugly conversion of multi-page TIFFs to PNGs. This article explains how to tweak Alfresco 3.3.x to get a better preview of multi-page TIFF documents in Share customizing the Alfresco transformers and using the last version of ImageMagick.

How the preview works

The preview mechanism is as simple as astonishing:

  • a Flash player embedded within the preview page is used to render some SWF content that represents the document to be previewed
  • the SWF content is dynamically retrieved from Alfresco by calling a webscript given the document node reference
  • when that webscript is called, it creates an SWF node through a chain of transformations from the document format to application/x-shockwave-flash
  • the SWF node is then stored as a child of the document node for further retrieval so that transformations are not unecessarily repeated
  • eventually, the webscript will send the SWF content back to the caller

I drew a simple sequence diagram that can help understand the interactions.
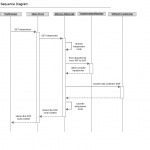
Trasnformations sequence diagram

This is what happens with document formats except for SWF documents and images (jpeg, gif, png, etc.), in which case the document content is returned as is (no conversion is needed for the Flash player to render those formats).

If you use Firebug to analyze the HTTP requests when the preview page is loaded you’ll see that urls follow this pattern depending on the document type:

  • for jpg, png and gif images: http://localhost:8080/share/proxy/alfresco/api/node/workspace/SpacesStore/fca7a769-5eea-4607-960d-de7f82382e98/content?c=force
  • for all other image formats: http://localhost:8080/share/proxy/alfresco/api/node/workspace/SpacesStore/19f7e50c-d16f-48fe-9851-b8b125d9a0b3/content/thumbnails/imgpreview?c=force
  • for all other formats but SWF: http://localhost:8080/share/proxy/alfresco/api/node/workspace/SpacesStore/19f7e50c-d16f-48fe-9851-b8b125d9a0b3/content/thumbnails/webpreview?c=force

All these requests are forwarded by Share’s proxy to the same webscript org/alfresco/cmis/content.get (see description at http://localhost:8080/alfresco/s/script/org/alfresco/cmis/content.get). As the description states, it streams the content of the specified document or its rendition:

  1. for images like jpg, png and gif no rendition takes place at all and document content is streamed as is
  2. for all other images, the document is converted to PNG: this is what happens by default with TIFF files
  3. in the last case, the document is converted to SWF

Since conversions of images in Alfresco are done by ImageMagick I supposed that this was the reason of the poor conversion of multi-page TIFFs to PNGs. In fact, I did some tests with the convert command and I found that I was using an old version of ImageMagick: 6.2.8 (RedHat Enterprise 5.4 comes with this package only). Anyway, I also did some tests on Windows with a more recent version of ImageMagick (6.5.7) and the best I could get was the preview of the first page of a multi-page TIF image. ImageMagick generates several files – one per page – from a single multi-page TIF file; I’m not completely sure, but I guess this is not what Alfresco expects.

From TIF to SWF

Anyway, I knew that Alfresco uses OpenOffice to convert documents into PDF files and Swftools to convert PDFs into SWFs; I supposed that if TIFF files could have been converted into PDFs then they could be transformed to SWFs as well. I had to figure out:

  • how to convert a multi-page TIF to PDF using some command line tool
  • how to configure Alfresco to convert TIF to PDF and then to SWF
  • how to tell Share to treat TIF files as other document formats

The answer to the first problem came soon when I tried a recent version of ImageMagick (6.6.4) to transform TIF files straight to PDF: in this case ImageMagick does a very good job and produces just one output file.

Understanding every single detail of a software is not always necessary in order to apply small changes, and this was the case. In a few minutes I wrote some xml files, changed a Javascript file in Share and start the whole thing up. And it worked!

The whole point is to learn how transformations are done in Alfresco: this is rather easy to do because every Alfresco component is injected and configured by Spring. Spring simplifies the definition and construction of components and makes it very easy to read how components are related to each other without even knowing what components do.

As always, the first step is to open the folder $TOMCAT_HOME/webapps/alfresco/WEB-INF/classes/alfresco and start reading some xml files that describe the transformation components (hint: search for files that contain the word transformer). You’ll see that at least two files define most of the transformers: content-services-context.xml and swf-transform-context.xml. I’m not going to drill down each transformer that is defined there because this will take too long but if you are interested I really suggest you to open these files and read the source code of referenced Java classes: you’ll see how easy the rendition mechanism is.

You may know that starting from version 3.2 Alfresco has the concept of subsystems. Subsystems are a very elastic way of configuring Spring beans and semplify extension and override. However, this is a very tough topic and it would deserve a separate post, so please refer to Alfresco documentation for a general overview of subsystems.

Alfresco transformers somehow rely on the subsystem mechanism. There’re two types of transformers (using my own terminology):

  • simple trasnformers, these do the hard job of transforming content from one format to another
  • complex transformers, these are built on top simple transformers to create a chain of transformations

Those of the first kind are configured through some sort of subsystem while those of the second kind are configured via the old way (in one of the two XML files I mentioned before).

We’re going to declare a complex transformer that explicitly converts from image/tiff format to application/x-shockwave-flash. This one in turn will rely on two simple transformers to perform a chain of renditions to application/pdf and to application/x-shockwave-flash.

We start defining a Spring context file under $TOMCAT_HOME/webapps/alfresco/WEB-INF/classes/alfresco/extension, lets call it tiff-transform-context.xml:

<?xml version='1.0' encoding='UTF-8'?>
<!DOCTYPE beans PUBLIC '-//SPRING//DTD BEAN//EN' 'http://www.springframework.org/dtd/spring-beans.dtd'>
<beans>
   <!-- Import the imagemagick transformer worker from the third party subsystem -->
   <bean id="transformer.worker.Tiff2pdf" class="org.alfresco.repo.management.subsystems.SubsystemProxyFactory">
      <property name="sourceApplicationContextFactory">
         <ref bean="thirdparty" />
      </property>
      <property name="sourceBeanName">
         <value>transformer.worker.Tiff2pdf</value>
      </property>
      <property name="interfaces">
         <list>
            <value>org.alfresco.repo.content.transform.ContentTransformerWorker</value>
         </list>
      </property>
   </bean>

   <bean id="transformer.Tiff2pdf" class="org.alfresco.repo.content.transform.ProxyContentTransformer"
      parent="baseContentTransformer">
      <property name="worker">
         <ref bean="transformer.worker.Tiff2pdf"/>
      </property>
   </bean>

   <bean id="transformer.complex.Tiff2swf"
        class="org.alfresco.repo.content.transform.ComplexContentTransformer"
        parent="baseContentTransformer" >
      <property name="transformers">
         <list>
            <ref bean="transformer.Tiff2pdf" />
            <ref bean="transformer.Pdf2swf" />
         </list>
      </property>
      <property name="intermediateMimetypes">
         <list>
            <value>application/pdf</value>
         </list>
      </property>
      <property name="explicitTransformations">
         <list>
         	<bean class="org.alfresco.repo.content.transform.ExplictTransformationDetails" >
                <property name="sourceMimetype"><value>image/tiff</value></property>
                <property name="targetMimetype"><value>application/x-shockwave-flash</value></property>
            </bean>
         </list>
      </property>
   </bean>
 </beans>

Now a bit of explanation about the beans involved here:

  • transformer.complex.Tiff2swf defines the complex transformer that defines the chain of transformers
  • transformer.Tiff2pdf represents the transformer from TIFF to PDF; actually this ia proxy that relies on the bean declared in the thirdparty subsystem
  • transformer.worker.Tiff2pdf is a sort of placeholder for that bean
  • transformer.Pdf2swf is the transformer from PDF to SWF and is defined by default in Alfresco (provided that you install Swftools and configure it in Alfresco)

Then we need to extend the thirdparty subsystem. Creates the folder $TOMCAT_HOME/webapps/alfresco/WEB-INF/classes/alfresco/extension/subsystems/thirdparty/default/default and add two files:

  • tiff-transform-context.xml
  • tiff-transform.properties

This is the content of tiff-transform-context.xml:

<?xml version='1.0' encoding='UTF-8'?>
<!DOCTYPE beans PUBLIC '-//SPRING//DTD BEAN//EN' 'http://www.springframework.org/dtd/spring-beans.dtd'>
<beans>
    <bean id="transformer.worker.Tiff2pdf" class="org.alfresco.repo.content.transform.RuntimeExecutableContentTransformerWorker">
      <property name="mimetypeService">
         <ref bean="mimetypeService" />
      </property>
      <property name="checkCommand">
         <bean class="org.alfresco.util.exec.RuntimeExec">
            <property name="commandMap">
                <map>
                    <entry key=".*">
                        <value>${img.exe} -version</value>
                    </entry>
                </map>
            </property>
         </bean>
      </property>
      <property name="transformCommand">
         <bean class="org.alfresco.util.exec.RuntimeExec">
            <property name="commandMap">
                <map>
                    <entry key=".*">
                        <value>${img.exe} ${source} ${target}</value>
                    </entry>
                </map>
            </property>
            <property name="errorCodes">
               <value>1</value>
            </property>
         </bean>
      </property>
      <property name="explicitTransformations">
         <list>
         	<bean class="org.alfresco.repo.content.transform.ExplictTransformationDetails" >
                <property name="sourceMimetype"><value>image/tiff</value></property>
                <property name="targetMimetype"><value>application/pdf</value></property>
            </bean>
         </list>
      </property>
   </bean>
 </beans>

Here is the content of tiff-transform.properties:

# External executable locations
img.exe=${img.root}/bin/convert

Transformer transformer.worker.Tiff2pdf is responsable for transforming a document using the ${img.exe} command; the value of ${img.exe} is set inside tiff-transform.properties where we reference the variable ${img.root} (which in turn is set in alfresco-global.properties). This transformer explicitly handles transformations from image/tiff to application/x-shockwave-flash.

The last thing to do now is to fix Share to make it request the SWF preview instead of the PNG thumbnail. This can be done easily by modifying the file web-preview.js under $TOMCAT_HOME/webapps/share/components/preview. Find method _resolvePreview and change it like this:

      _resolvePreview: function WP__resolvePreview(event)
      {
         var ps = this.options.previews,
            webpreview = "webpreview", imgpreview = "imgpreview",
            nodeRefAsLink = this.options.nodeRef.replace(":/", ""),
            argsNoCache = "?c=force&noCacheToken=" + new Date().getTime(),
            preview, url;
         
         if (this.options.mimeType.match(/^image\/jpeg$|^image\/png$|^image\/gif$/))         
         {
            /* The content matches an image mimetype that the web-previewer can handle without a preview */
            url = Alfresco.constants.PROXY_URI + "api/node/" + nodeRefAsLink + "/content" + argsNoCache;
            return (
            {
               url: url,
               paging: false
            });
         }
         else if (this.options.mimeType.match(/application\/x-shockwave-flash/))
         {
            url = Alfresco.constants.PROXY_URI + "api/node/content/" + nodeRefAsLink + argsNoCache + "&a=true";
            return (
            {
               url: url,
               paging: false
            });
         }
         else
         {
            if (this.options.mimeType.match(/^image\/tiff$/))
                preview = webpreview;
            else
                preview = Alfresco.util.arrayContains(ps, webpreview) ? webpreview : (Alfresco.util.arrayContains(ps, imgpreview) ? imgpreview : null);
            if (preview !== null)
            {
               url = Alfresco.constants.PROXY_URI + "api/node/" + nodeRefAsLink + "/content/thumbnails/" + preview + argsNoCache;
               return (
               {
                  url: url,
                  paging: true
               });
            }
            return null;
         }
      },

Once you have applied your changes, restart Alfresco, enter Share, refresh the preview page (make sure that browser cache is cleaned) and multi-page TIFFs should be previewed correctly.

Some news

The embedded SWF player in Share is SWFObject, a project that has now moved to Google Code.

The sequence diagram was drawn with Gliffy.

Improving Confluence with Greasemonkey

Here at GetConnected we are using Confluence and Jira since some months and I must admit that I’m really satisfied of both these products. They helped me to easily keep track of the documentation and activities’ progress.

Before adopting Confluence I’ve tried several wikis – most of which opensource – but none really fit our need. These are some of the features of Confluence which I considered important and that other wikis didn’t have or supported only partially:

  1. Pages can be moved to other page, that is a page can abandon its parent page and become child of another page: damn, this is so useful, I don’t know how many times I change my mind about how to organize pages. I don’t really understand why so few wikis support this… This is a must have for me now.
  2. Renaming a page causes links to that page from other pages to be adjusted as well
  3. Minimalist and simple syntax, you can learn it in few minutes and you won’t use the WYSIWYG editor anymore (but will type faster).
  4. That said, the WYSIWYG editor just works: not everyone in a company likes to play with codes just to edit a page.
  5. Confluence has tons of plugins, you can surely find the one that fits your needs.
  6. You can write your own macros and page templates.

Coming back to the topic of this post, only one things disappointed me a bit until now: the navigation bar with the Edit and Add menus are only at the top of the page, if you’re reviewing a long page and want to edit it you need to go up to the top of the page. Of course this is not a big problem actually, but it’s worth the effort of spending some time trying to improve the usability.

So today I wrote my first Greasemonkey script. It took me only few minutes to quickly read a small tutorial and the hack was done.

Greasemonkey is a Firefox plugin that lets you execute custom Javascript code in order to change the appearance and functionality of a certain web page. Many plugins exist that change the overall aspect of GMail and Google, for instance, you can find them here: http://userscripts.org.

My script is very elementary, all it does is adding a new CSS rule that overrides the default settings thus making the navigation bar position fixed:

#navigation {
-moz-border-radius:5px;
background-color:#F1F1F1;
padding-bottom:10px;
padding-right:10px;
position:fixed;
right:15px;
}

The Javascript code could be writte on one single line without losing readability:

document.styleSheets[0].insertRule(
    '#navigation { ' +
    '-moz-border-radius:5px 5px 5px 5px; ' +
    'background-color:#F1F1F1; ' +
    'display:inline; ' +
    'padding-bottom:10px; ' +
    'padding-right:10px; ' +
    'position:fixed; ' +
    'right:15px; ' +
    ' }', 0);

This is how Confluence looks when you open a page:

Confluence-Greasemonkey script 1

How the navigation bar appears when the page is opened

And this is how it looks when you scroll the page down:

Confluence-Greasemonkey script 2

How the navigation bar appears when you scroll the page down

Greasemonkey scripts are distributed through the http://userscripts.org site. If you think that the script I wrote can be useful, install it and drop a line of comment.

Daily newspaper download with curl

Today I was reading about the election of Stefano Zacchiroli as Project Leader of the Debian project. Since his surname sounded pretty italian I did some research about him and happily found that he really is italian and he also studied at the University of Bologna just like me (though he graduated few years before). I personally never met him even if he was a researcher there in the same years I were attending. I’m very happy for him and proud that an italian reached such a position.

Reading his blog I then found something I should have written about months ago, after the newspaper Il Fatto has gone published. Just like Stefano, I wrote a script to download the newspaper on a daily base. I’m making it public so that anyone who subcribed to Il Fatto can use it. You can download it from here.

Create a file called .ilfattorc in your home with your credentials:

username="USERNAME"
password="PASSWORD"

Sobstitute USERNAME and PASSWORD with yours, of course.

The script is made of two files, one written in Bash, the other in Ruby. Save them in the folder you want the pdfs to get downloaded. It uses the curl tool for the HTTP requests. The Ruby part calculates a list of dates starting from a given one, up to the current and prints them in the required format. Basically the script downloads the pdfs of the newspaper for every day since the day of the last downloaded pdf and up to the current date.

The general steps to authenticate against the web server with curl are the following:

  1. get the login page and save cookies
  2. use the saved cookies to submit username and password along with other login parameters

Once you are authenticated, that is you have all the necessary cookies, you will simply have to send a request to the download url and save the output content.

How these steps are implemented is very specific for each case and I suggest to read the source code to understand them in the case of Il Fatto. If you’re trying to do something similar for other services I suggest you to first clarify how the whole procedure works paying particular attention to cookies, redirects and submitted parameters in POST calls. To do this I would consider using Firebug and Firecookie Firefox plugins.

If you are as lazy as me and want the newspaper to be downloaded every day automatically, then configure Anacron.
Edit your user crontab (with crontab -e) and enter this content (adjust paths according to your environment):

# m h  dom mon dow   command
25 * * * * /usr/sbin/anacron -t /home/fabio/.anacrontab -S /home/fabio/.anacronspool

This will run anacron at the 25th minute of every hour.
The create the .anacrontab file and the .anacronspool directory under your home folder. The content of .anacrontab will be something like (adjust paths according to your environment):

1   0   ilfatto.daily   /home/fabio/Desktop/ilfatto/download.sh

This statement will ensure that the download script will be called just one time per day.

Have a nice reading and good luck to Stefano Zacchiroli.

Update

The scripts have been updated to work with the new site of Il Fatto Quotidiano.

LinkedIn survey

Yesterday I contributed to a short questionnaire made by a LinkedIn client which made me 10 euros. The questions fell within the scope of software development tools and languages with special emphasis on Microsoft, Oracle and IBM tools. Also opensource tools were covered, Eclipse and Java in particular.

I guess the small incentive of 10 euros was a way for the LinkedIn client to motivate users to properly compile it. However the survey took about 20 minutes and at last it became quite boring and repetitive.

LinkedIn offered several options to redeem the incentive: a transfer to a Paypal account, an Amazon Gift Certifcate and a donation to some non-profit organizations. I choose the Paypal transfer and then donated the money to the upcoming italan event against censorship Rai per una notte which will take place next thursday in Bologna.

Thank you LinkedIn!

Sudo like tool for Alfresco – security aspects

In my first post in this blog I proposed a way to execute some javascript code with the admin privileges within the Alfresco (web)scripts.
As Peter Monks pointed out in his comment, there’re some risks concerning security you’d better be aware of if you intend to use this extension in your projects.
As Peter suggested, if users can author their own scripts then they can potentially submit code that runs with administrator privileges, which is an obvious security flow.
Also, attention must be paid in case the eval statement is used within the sudo argument function: avoid this kind of practice if the eval argument itself depends on some webscript input parameter since this could potentially lead to code injection. So how to cope with these problems?
My solution is to create a “sudoers” group (as in the Unix OSs) so that only users that belong to this group can execute the sudo function. Here is how I would change the Sudo bean:

public class Sudo extends BaseScopableProcessorExtension {
    private AuthorityService authorityService;

    public void sudo(final Function func) throws Exception  {
        final Context cx = Context.getCurrentContext();
        final Scriptable scope = getScope();
        String user = AuthenticationUtil.getRunAsUser();

        Set<String> groups = authorityService.getContainingAuthorities(AuthorityType.GROUP, user, false);
        if (!groups.contains("GROUP_SUDOERS"))
            throw new Exception("User '" + user + "' cannot use sudo");

        RunAsWork<Object> raw = new RunAsWork<Object>() {
            public Object doWork() throws Exception {
                func.call(cx, scope, scope, new Object[] {});
                return null;
            }
        };

        AuthenticationUtil.runAs(raw, AuthenticationUtil.getAdminUserName());
    }
}

We used the authorityService service to get the set of groups the current user belongs to and then we checked that the SUDOERS group is one of those. If you use this version of the Sudo bean, remember to update the Spring bean definition (file sudo-script-services-context.xml):

<?xml version='1.0' encoding='UTF-8'?>
<!DOCTYPE beans PUBLIC '-//SPRING//DTD BEAN//EN' 'http://www.springframework.org/dtd/spring-beans.dtd'>
<beans>
    <bean id="Sudo" parent="baseJavaScriptExtension" class="eu.fabiostrozzi.sudo.ws.js.Sudo">
        <property name="extensionName">
            <value>sudoUtils</value>
        </property>
       <property name="authorityService">
             <ref bean="AuthorityService" />
       </property>
    </bean>
</beans>

This is by no means a fully fledged solution but surely reduces risks if, for instance, users that can author scripts are not added to the SUDOERS group.

Sudo like tool for Alfresco webscripts

This year we at GetConnected worked a lot on integration solutions based on Alfresco. Integrating customers’ softwares with Alfresco means, first of all, facing  with different permissions models: the Alfresco’s one and that of the external software. Most of the times they differ and it couldn’t be otherwise: althought Alfresco is an extendable, general purpose product, external softwares target specific problem and have ad-hoc solutions. Continue reading “Sudo like tool for Alfresco webscripts” »